Constant and never ending improvement, right?
Still, my Gmail inbox is flooded with hundreds of messages making it hard for me to find what I need at times and it definitely slows things down.
I’m sure no one else out there has experienced this problem.
If you are using Gmail, you’ll also know that Google’s mail facility is structured a little differently from other email systems, like Lotus Notes. A system like Lotus Notes uses a series of folders to hold messages, a structure much like the folder system in MS Windows. You can drag and drop messages to the appropriate folder and clean up your inbox allowing you to focus on the really urgent and important stuff.
Gmail, on the other hand, uses labels to mark messages, making it possible to classify a single message with multiple descriptors and appear under many different grouping, something that isn’t possible in Lotus Notes. However, dragging and dropping of messages is not an option, which has the potential for leaving our Gmail “Inbox” extremely cluttered with stuff we’d rather put into another folder for reviewing later.
Why can’t we just move all of those messages into their own folder like we can do with Lotus Notes?
Well, we can, sort of.
As I mentioned, Gmail uses labels and filters to give you the view you want of your messages when you want it. I mentioned this before briefly, but here is a quick overview.
Gmail Labels vs. Lotus Notes Folders
Instead of all messages coming in and getting dumped into your inbox folder like Lotus Notes or Yahoo Mail, all incoming messages in Gmail get tagged with a default label and placed into a big generic message pool or message database. In most cases, this default label is “Inbox”, but sometimes, if the Gmail spam filters decides that the incoming message is actually something more nefarious, it will label the message with the “Spam” label.
So when I log in and look at my “Inbox”, I’m actually looking at my entire Gmail message database through a filter that shows only those messages with the label “Inbox”.
If I switch it up and click “Spam” along the sidebar, then Gmail will show me the entire message database through the filter that only shows messages with the label “Spam”.
And if I want to keep a message but I don’t want it to come up in my “Inbox” view, then by hitting the “Archive” button when that message is selected will strip the “Inbox” label off and stop it from showing up when I use the “Inbox” filter. The message, however, is still available and can be seen by hitting the “All Mail” link.
Organize Your Messaging And Sales Activity For Maximum Effectiveness
So what does this mean if you’re in sales and you’re using Gmail, or running Google Apps?
Well, if you are like many of the other sales reps I’ve talked with, you are probably experiencing a lot of angst resulting from all of your incoming messages getting dumped into your “Inbox”.
You are probably frustrated because you can’t drag and drop any of those messages from your inbox folder to a new and appropriately entitled folder to classify your email.
And you are probably exasperated with sorting through a bunch of messages that are necessary but at the moment are only adding to your confusion and disorganization.
What you really want is to have some of some of these incoming messages marked with the appropriate label and NOT have them show up in your “Inbox”. And you don’t want to spend time going through your mail manually selecting messages to label them individually.
After all, in sales, we have to be able to manage our time and our resources as quickly as possible – right?
Well, there IS a way to make this happen in Gmail.
Check it out.
Setting Up Gmail Filters To Automatically Label And Categorize Your Incoming Messages
Here we see my favorite test subject, the EPW Test Dude, back in action:

The EPW Test Dude is still getting a fair amount of exotic spam emails. Fortunately, Google deletes messages over 30 days old. In the above screenshot, what’s left of the spam has been moved to the “Inbox”. The number in parenthesis indicates how many unread messages we have in the inbox, in this case, 14 messages are left unread.
Let’s see what kind of damage we can cause.
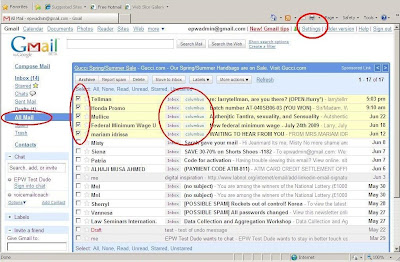
In the next screenshot, we have selected the first 5 message and by hitting the “Labels” button, we can assign one of our labels to the selected messages. In this example, we will label the selected messages with the “Columbus” label.

As you can see, the five messages that were selected now have the “Columbus” label tied to them. In this screen shot, we are looking at all of the messages, so we also see all of the messages that have the “Inbox” label attached to them as well.

Let’s see what we can do. Hit the “Settings” link at the top of the page and go to the “Settings” page:

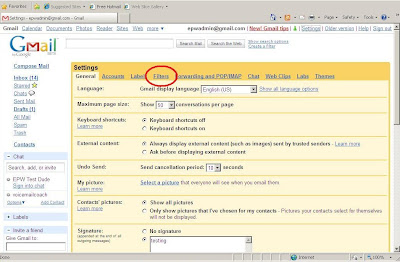
Then click the “Filters” tab and let’s create a filter:

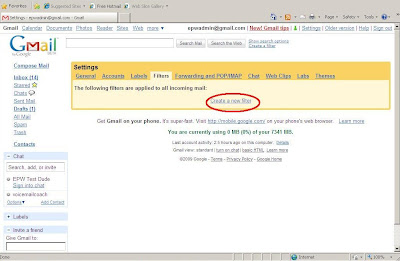
Go ahead and hit “Create a New Filter”:
In this next screen shot, we can identify the elements that will determine which emails will be selected. You can identify elements from the “From:” field in the incoming message, like specific people who send you messages, or the “To:” field, the intended recipient of the message. You can also pick the “Subject:” field if there is something in there that you want to trigger on, say, for example, any incoming messages that have Gmail in the subject line.
You can also set up the filter to search for certain words or if it lacks certain words in the body or even if it has attachments. For our purpose, we will search for all messages coming from our buddy, the voicemailcoach:

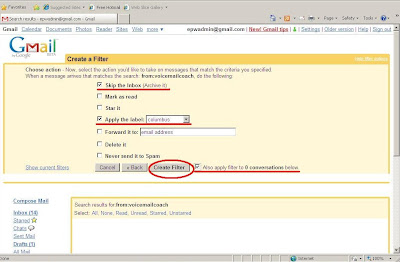
The shot of the next screen is where we begin to take control. We already know how to identify specific messages. Now we can select the action to take on those messages. In this instance, we will apply the label “Columbus” to all of these messages. In addition, however, we hit the first check box that is entitled, “Skip the Inbox (Archive it)” and this will stop Gmail from putting the label “Inbox” on all incoming messages.

We can also hit the small checkbox that indicates that we want to perform this action on all messages that are currently in the account. In our example, we have no other messages from the voicemailcoach so it doesn’t really affect us.
Once all of the actions have been selected, hit the “create filter” button and you are off to the races.

In this shot, we see the usual “Inbox” view. We see that there are 14 messages and we see that the first 5 also have the “Columbus” label attached to them. Off in the left-hand column, we also see the total number of messages associated with our “Columbus” label – again 5 messages.

This screen shot looks almost the same as the previous one except for one minor difference. If you look back at the “Columbus” label, you’ll see that there are now 6 unread messages in it. Yet, the “Inbox” view has not changed. There are still 14 unread messages total and 5 of them have the “Columbus” label. What gives?

Hitting the “Columbus” label link provides us with an inside view of what’s been label with “Columbus”. We see that the voicemailcoach has sent us a message and it appears in our “Columbus” view, but it didn’t show up in the inbox. Also notice the labels here. Five of the messages are labeled with “Columbus” as well as “Inbox”. The message from the voicemailcoach, however, has only the “Columbus” label and not the “Inbox” label, which explains why we did not see it in our Inbox view.
So, by “Archiving” our incoming messages, we can effectively remove them from our “inbox” view. And with the proper application of filters to label all incoming messages, you can rest assured that all of your incoming messages will be placed where you need them saving you a whole lot of time and frustration.