First, in the prior post on forwarding email to your gmail account, we used the Lotus Notes web interface called iNotes. It’s only slightly different from using the Lotus Notes Client, which is what we’ll use here. However, one of those differences is in how iNotes sets up rules. In iNotes, we can create one complex rule that will reroute and then delete all incoming email. That's not possible with the Lotus Notes Client. So we’ll have to take a different approach.
Let’s get started.
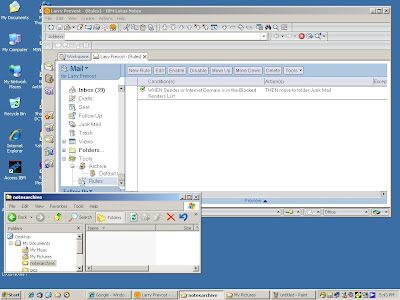
Here we start off in the rules folder. As you can see, I already have one rule set up in Lotus Notes to handle Junk Mail. It essentially says when a sender is on the list of blocked senders or they live in a blocked domain, then immediately move the email to the Junk Mail folder.

From this window, click on the New Rule button (the one right under the tab entitled Larry Prevost (rules) X. This will open up a new window where you will create your new rule for handling incoming mail.

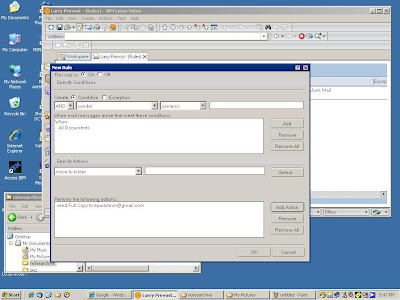
Rules follow certain steps where it looks at a condition and then takes an action if that condition is met. The first step is to create the condition to examine when mail comes in to your account before deciding on an action to take. The way the window comes up initially, it assumes that you will want to look for certain words that are contained in the sender’s name. However, we want all our action to happen on all incoming mail. So click on the down arrow where you see the word sender. This will give you a list of options of what to examine when mail comes in. Scroll down to the option that says All Documents:

After you select All Documents click on the Add button to put the condition in place:

Now that we have the condition set, move down to the Specify Actions area. There is a data entry box that has move to folder. Click on that down arrow and select send copy to. When you do that, an addition box will appear. This box is where you will put your target email address. In this example, I’ve put in my favorite email address, epwadmin@gmail.com. Also, in the data entry box next to the box that has the “send copy to”, you will find another data entry box. It should say full because we want the full content of the email sent to our gmail account, not just the header or an abridgement.

Once you have your gmail address put in, click the add action button to set the action for the rule:

So now I have created a rule that essentially says for all incoming documents, send a full copy to epwadmin@gmail.com. Now the only action left is to hit the “OK” button to install the rule:
Now there are two rules in this system: the first rule searches the incoming mail to make sure that the sender is not on the blocked list and the other rule sends a full copy of the mail to epdadmin@gmail.com. The only snag here is that the incoming message is then placed into the Lotus Notes Inbox.
So we are going to create one more rule. Click that new rule button once again:

We are going to once again take action on all documents so hit the down arrow in the box that has sender in it, select all documents and hit the add button:

Next, we will select the action to take but this one is going to be a different action. Under the specify action section, click the down arrow where you see send copy to and this time select delete (don’t accept message):

Once you’ve done this, hit the add action button:

Then hit the OK button to install the rule. Now, for this example, you see three rules in the rules window:

Now realize this. The order of the rules is important. Each incoming message will be subjected to the rules in a sequential fashion. So in this example, when a message comes in, it hits the first rule where it is checked to see if the sender is on the blocked list. If the sender is on this list, then that’s the end of the road for the message. It gets routed to the junk folder. If the sender is not on the blocked sender list, then the incoming message hits the second rule that sends a copy to epwadmin@gmail.com.
Then the message gets to the third rule, which effectively says don’t accept message. So the message is not put into the Lotus Notes inbox. This last rule stops the Lotus Notes Database from growing, reducing the amount of time you have to expend managing it.
Once you realize that every piece of mail will be subjected to these rules as it comes in, you can begin to add more rules as you see fit. For example, if you want to automatically send a copy of your email to multiple target email addresses it a simple matter to add additional rules to handle that function. Or if you want messages from certain senders to be automatically moved to a special folder (or forwarded to another account) you can implement a rule that will automatically examine incoming messages and take the appropriate action.
Rules give you some flexibility as well as some automation in how your incoming messages are handled. If used appropriately, you can set these rules up to help you in your sales effort, better organize your message handling and help you save time in your selling effort.
And being more efficient in how we handle our incoming messages is exactly what we need to help us sell in these tough times.
If you think rules provide you with magic in Lotus Notes, just wait ‘till you get to gmail!